Announcement: My online Land Navigation course includes four hours of video instruction, and two downloadable PDF books, all for about the same price as a typical paperback book. Get my Land Navigation course here.
How to Use an
Orienteering Compass
An orienteering compass, sometimes called a base plate compass, has the advantage of being a compass and a protractor combined. What this means to you is that a protractor is one less piece of equipment you'll need to carry.
Parts of An Orienteering Compass

Fixed Sight – Use the fixed sight whenever you need direction measurements as accurate as 2 degrees.
Direction of Travel Indicator – When the spinning dial is set to your intended course, and when the needle is within the luminous north box, this indicator points the way.
Sighting Mirror — Used in conjunction with the fixed sight to take bearings of distant objects, or to “shoot” an azimuth, meaning to determine a specific compass direction.
Spinning Dial – A large dial that is not too hard to spin and is marked from 0 to 360 degrees is most useful. There are dials formatted in ways other than 0 to 360. They serve some specific purpose, I suppose, but for our purposes here the 0-to-360 degree dial makes the most sense.
Luminous Needle – A luminous needle is useful for night navigation. When charged with a flashlight or other light source, it glows for 10 or 15 minutes, allowing you to navigate without a light.
Luminous North Box – This is the dial’s indicator used to box the needle. To “box the needle” means to hold the compass horizontally and rotate it until the needle’s north end comes to rest inside the luminous north box. Being luminous makes the compass usable in the dark.
Base Plate – Use the base plate as a ruler for measuring distances, or in combination with the spinning dial, as a protractor for measuring map angles.
Finding Direction with an Orienteering Compass
There are 360 degrees in a circle. At any given spot on the earth, you can--as the terrain allows--proceed in any one of these 360 directions. The direction you choose naturally depends on where you want to go.
To determine that direction:
1. Place your compass’s baseplate with mirror open on the map with one edge of the baseplate—it doesn’t matter which edge—touching:
the spot where you are now
and
the spot where you want to go.
If these two map spots are farther apart than the combined length of your base plate and mirror, place a ruler on each spot, then, place your base plate along the ruler’s edge.
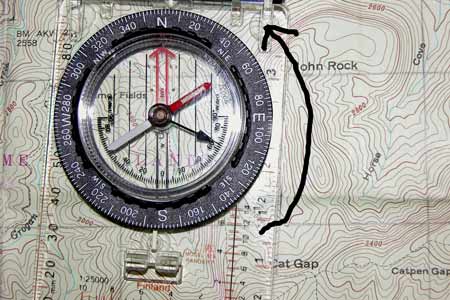
You are, for example, at Cat Gap and you want to go directly to John Rock. (In many instances when navigating over land, you’ll normally want to choose the most sensible—not necessarily the most direct—route to your destination.)
Place one edge of the compass’s baseplate on Cat Gap and John Rock, as shown in the next picture, making sure the Direction of Travel indicator is pointing in your intended direction.

2. Next, with the orienteering compass properly placed on the map as described above, turn the dial so that its direction lines are aligned with the north-south lines on the map, making sure luminous north box—sometimes known as the red “shed”—is pointing to north on the map.
For purposes of this task, you can totally ignore the needle. Right now, you’re using the orienteering compass as a protractor to measure a map angle, NOT as a compass. What the needle is doing doesn’t matter.
Once the dial’s direction lines are properly aligned with the map’s north-south lines, your compass is set—without regard to magnetic declination—to the proper number of degrees (in this case, 005 degrees) for your intended course.
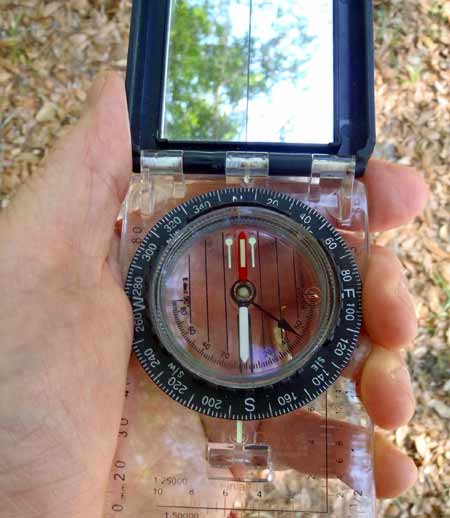
3. Now, hold your orienteering compass level and squarely in front of you with the direction of travel indicator facing ahead. Then, rotate your entire body until the red north-indicating compass needle is squarely inside the red luminous north box. One way, I’ve heard this explained is to:
Put Red Fred (i.e. the red end of the compass needle) in the shed (i.e. the red luminous north box).
With Red Fred snugly inside his shed, the direction of travel indicator is now pointing the way you should go—that is, the way you should go without regard to magnetic declination, something we normally should not disregard. If you haven't read the page just hyperlinked, may I suggest you read it now.
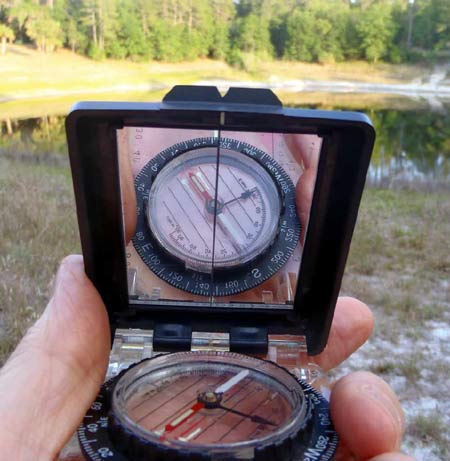
Using the Fixed Sight to Determine a Bearing to a Distant Object
1. Angle the mirror so that you can plainly see the compass dial in the mirror.
2. Put the distant object in the sight’s notches, making sure the line running down the mirror’s center is lined up with the needle’s pivot point.
3. Now, while maintaining the distant object inside your sight’s notches, and while continuing to look at the dial in the mirror, adjusting the mirror as necessary to get the best view of the dial, and maintaining the mirror’s center line lined up with the needle’s pivot point, rotate the dial until you box the needle, that is, until you put Red Fred in the Shed.
The number in degrees now dialed into your compass is the magnetic bearing to the distant object.
Using the Fixed Sight to “Shoot” an Azimuth
1. Dial your intended azimuth (i.e. compass direction) into the compass.
2. Angle the mirror so that you can plainly see the compass dial in the mirror. Make sure the line in the mirror’s center is lined up with the needle’s pivot point.
3. Holding the compass squarely in front of your face, turn your body as a unit until you’ve boxed the needle, that is, until Red Fred is in the Shed.
4. Find some distant object lying in your sight’s notches. That object lies along your intended azimuth. If you do it right, this method is accurate to about two degrees, which is plenty accurate for most recreational land navigation purposes.
5. To follow the course indicated by your azimuth, proceed toward the distant object you identified in your sights.
6. Repeat the whole procedure as necessary.